Project : step 2.1
Laboratory and culture boxes
Disclaimer: the automatically generated English translation is provided only for convenience and it may contain wording flaws. The original French document must be taken as reference!
Goal: Set up the environment in which the bacteria will grow.
Preamble
The aim of this stage is to produce an initial graphical programme that allows us to visualise culture boxes and place nutrient sources within them that can grow depending on the temperature.
- an attribute of type Laboratory containing a set of CultureDish;
- methods allowing to call in loop an update method (update) and a drawing method (drawOn) on this attribute. The update method will be responsible for evolving the "laboratory" over time, and the draw method for rendering it graphically. The parameter target of the latter represents the graphics window on which the drawing is performed. Each iteration of the loop is called a «simulation cycle».
The class Application also has a handleEvent method (line 503 of Application.cpp) that allows the simulation to respond to keyboard inputs: for example, pressing the Esc key terminates the simulation (closing the window). Please bear this method in mind for later.
We will now proceed to code the CultureDish and Laboratory classes.
The CultureDish class
The bacteria we will be simulating will be confined within a culture dish. The conditions inside this dish, such as temperature and nutrient levels, will determine how the bacteria living there develop.
A CultureDish class is required, and here are some attributes that would naturally be included:
- the set of bacteria inhabiting the dish. We don’t have any yet, but they will arrive sooner or later: simply create a Bacterium class in the directory src/Lab. This class will be empty for now!
- the set of nutrients source for the bacteria. You will need to create a Nutrient class, also empty for now, to model a nutrient source. The code for this class will also be placed in the src/Lab directory.
- and the temperature inside the box (a double).
Build > Run Cmake
in QtCreator, if you want it to be correctly taken into account during the next compilation.
To model a set (of bacteria or nutrient sources), you can use a dynamic array and store pointers to the objects in it. Remember that a dynamic array can be traversed by iterating over a set of values :
for (const auto& bacterie : lesBacteries)ou
for (auto& bacterie : lesBacteries)
The following methods should be defined for the CultureDish class :
//implement the bacteria behaviour here:or
//code to add nutrients here:to remind you of the task to be coded later
- a method bool addBacterium(Bacterium*) which will allow you to populate the box (add a bacterium to the set of bacteria in the box). Under certain conditions, it will not be possible to place the bacterium in the box as intended. The bool return type is used to indicate whether the bacterium has been successfully placed or not;
- a method bool addNutrient(Nutrient*) that will allow nutrients to be placed in the box. The bool return type serves the same purpose as for the bacteria;
- a method void update(sf::Time dt) that will be primarily responsible for updating all the bacteria in the box, as well as the nutrient sources, at each time step.
- a method drawOn(sf::RenderTarget& targetWindow) which will be responsible for drawing the outline of the dish, as well as the bacteria and nutrients within it, onto a graphics window (targetWindow) :
the inclusion of <SFML/Graphics.hpp> is required to access the RenderTarget type.
Upon creation, a culture dish will have a temperature set to the value returned by the expression getAppConfig()["culture dish"]["temperature"]["default"].toDouble() which will be explained in the next step (the inclusion of Config.hpp is necessary).
[Question Q2.1] In order to represent the culture dish graphically and to define its boundary – for example, to prevent bacteria from escaping – we want to treat the dish as a circular boundary (which will, of course, have a position within the two-dimensional environment used for our simulations). How can we use the CircularBoundary class to model this ? Answer this question in your REPONSES file, then provide the CultureDish class with a constructor that takes a position (a Vec2d) and a radius (double) as parameters.
[Question Q2.2] Which methods do you think it would be sensible to declare as const? Answer this question, justifying your choices, in your REPONSES file.
[Question Q2.3] We do not want to allow the copying or assignment of a CultureDish. What solution(s) would you propose to satisfy this constraint? Think about it, answer this question in your REPONSES file and implement your code accordingly.
[Question Q2.4] The question Q2.3 suggests that each simulation will focus on dishes, each containing its own set of bacteria and nutrients. Furthermore, in the context of this project, it makes little sense to keep bacteria alive without linking them to a dish. A CultureDish can therefore be considered responsible for the lifespan of the bacteria and nutrients that will be created in the simulation. How does this affect the destruction of a culture dish ? Can destruction be carried out using an existing method of the CultureDish class. Answer these questions in your REPONSES then code the CultureDishdestructor.
Drawing a culture dish
Now that our culture dish has a radius and a position, we can return to the CultureDish::drawOn method to make it do something. Complete the code for this method so that it draws the outline of the dish.
  auto border = buildAnnulus(position, rayon, couleur, epaisseur);
  target.draw(border);
The buildAnnulus function is available in Utility.[hpp][cpp]
- position is the position of the centre of the ring (in this case, the position of the centre of the CultureDish);
- rayon its radius,
- couleur a colour recognised by SFML (for example, use a colour initialised as follows: sf::Color color(255,255,255,100) for a slightly transparent white, or look up sf:: Color in the documentation to find out about other colours);
- and epaisseur the line thickness (use 25 for example).
Before we can test these new developments, we will need to take our design a step further, in the direction suggested in the preamble.
The Laboratory class
The Laboratory class will model the platform on which culture dishes are placed. The basic idea is that only one culture dish will be visible at a time, and that the user will subsequently be able to switch between dishes using control keys.
To begin with, a Laboratory will have as its main characteristics a set of CultureDish (vector), as well as the index of the current dish : the one being visible. It must not be possible to copy it.
For this particular class, the main methods are specified in a fairly detailed and precise manner. The aim is to ensure compatibility with the provided simulation engine. Remember that it is via a Laboratory-type attribute that the link is established between your code and the simulation engine (Application). You will therefore need to provide the following methods :
- void nextDish() which increments the index of the current dish by one. This works in a circular manner: when the maximum possible index is exceeded, it wraps around to zero;
- void previousDish() which decrements the index of the current dish by one. This will also work in a circular manner: when the index falls below zero, it wraps around to the maximum possible index;
- size_t Laboratory::getCurrentDishId() which returns the index of the current dish;
- increaseTemperature() and void decreaseTemperature() which are used to increase or decrease the temperature of the current dish; for now, you can simply set them to increase or decrease by any fixed value;
- getTemperature() which returns the temperature of the current box;
- reset which clears the contents of the current box (its bacteria and nutrients);
- and void resetControls(), currently empty, the purpose of which will be explained a little later.
- To ensure proper encapsulation, the CultureDish class must not provide access to its culture dishes via getters;
- The getAppEnv() method, which can be used after including Application.hpp, returns the Laboratory associated with all the graphical tests you run.
- To avoid unnecessary circular dependencies between classes, ensure that you only include Application.hpp in the file that uses this functionality.
For example, if it is Laboratory.cpp that uses getAppEnv(), you must include Application.hpp in Laboratory.cpp and not in Laboratory.hpp.
A typical example of a circular dependency: Laboratory.hpp includes Application.hpp, which includes Laboratory.hpp (and this confuses the compiler).
[Question Q2.5] At present, updating a Laboratory simply involves updating its culture boxes, and drawing it means drawing the current index box, as there is no point in drawing what cannot be seen. How would you propose to code the body of the Lab::drawOn and Lab::update methods? Answer this question in your REPONSES file.
Next, provide your Laboratory class with a constructor that positions the current index cell in the centre of the graphics window associated with the Laboratory, with a diameter occupying 95% of the width of that window. This constructor will provide the Laboratory with a fixed number of boxes, and the current index will point to the first box (the one with index zero). The number of boxes is specified using the function getShortConfig().culture_dishes_number (requiring the inclusion of Config.hpp). This function will be explained in detail in the next step; for now, it is sufficient to know that it returns the value of the constant defined on line 78 of Config.hpp, i.e. 3. This value can be changed as you wish.
- The graphical window associated with the Laboratory is in fact the mSimulationFrame component, as described in the comments for the Application::createViews() function in the Application.cpp file;
- the statement getApp().getCentre() returns the centre of the graphical window associated with Laboratory;
- getApp().getLabSize().x gives the width of this window
Test 2 : empty culture boxes
To test your code, a graphical application is provided in src/Tests/GraphicalTests/NutrientTest.[hpp][cpp].
- pressing the 'R' key on the keyboard results in a call to the Lab::reset method, which should empty the culture box;.
- pressing the 'N' key results in the creation of a nutrient source (once you have done the necessary, a little further on).
- pressing the 'T' key should result in drawing a certain amount of nutrients from the last nutrient source created.
The provided CMakeLists.txt file allows you to run the test compilation using the nutrientTest target
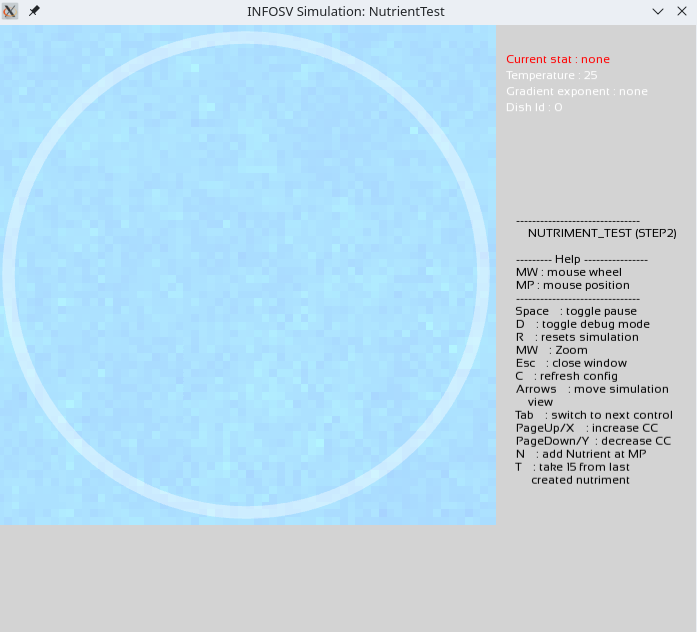
Set up the 'R' key. If you have coded everything correctly so far, running this test should allow you to see the cultivation box (white ring) appear in the part of the graphical interface reserved for this purpose :
Controls
Certain key simulation parameters must be directly controllable from the graphical user interface. This is the case with the current simulation box : we would like to be able to switch between boxes by pressing a key.If you open the file Application.cpp, you will see that the necessary mechanisms are already in place. For example, the methods nextDish and previousDish are indeed called by the method handleEvent. Other parameters besides the current dish can also be controlled via the interface; the temperature of the current dish, for example.
When you run nutrientTest, the items displayed in the menu at the top right are the controllable parameters, and you can switch between them using the Tab key or the Q key. The parameter displayed in red is the one that can be adjusted via the graphical interface. The explanatory banner at the bottom right indicates that the 'PgUp' or X keys, as well as the 'PgDn' /Y keys, allow you to increase or decrease the value of the selected parameter (the one in red).
Use these keys to navigate to the Dish id parameter. Then check that your nextDish and previousDish methods have been coded correctly. For each possible identifier value, an empty box should be displayed.
Back to project description (part 2) next step (part 2.2)