Project: Step 4.2
Grappling Bacteria
Disclaimer: the automatically generated English translation is provided only for convenience and it may contain wording flaws. The original French document must be taken as reference!
Objectives: The goal here is to introduce a new type of bacteria that moves using a grappling hook.
The tentacle of this new type of bacteria, named PilusMediatedBacterium, will affect its way :
- of moving
In addition to sensing the nutrient gradient, the bacterium will be able to extend its tentacle in a random direction. If the gripper touches a nutrient source, it will retract, pulling the bacterium along with it (which will thus reach the source in question). Coding the movement method will be the most complex part of this section, and instructions will be provided below.
- to consume energy
extending the pilus (in search of food) comes at an energy cost to the bacterium.
- to mutate
the maximum length of the pilus and its extension speed will be among the bacterium’s mutable parameters.
A bacterium with a grapple will divide in a manner similar to a bacterium with a single flagellum; however, the division must, of course, produce a PilusMediatedBacterium. It is recommended to shift the clone slightly and direct its grapple differently for better observation of the cloning process.
[Question Q4.6] What inheritance relationship(s) do you propose to implement to integrate the PilusMediatedBacterium into the existing architecture ?
[Question Q4.7] Drawing inspiration from what you did for single-flagellated bacteria, and by examining the contents of the configuration file app.json, how do you propose to access the parameters characterizing this type of bacteria (such as the maximum length of its grapple or its extension speed)?
[Question Q4.8] Which methods already present in the bacteria class hierarchy must you redefine in PilusMediatedBacterium?
Answer these questions and justify your choices in your REPONSES file.
Finally, a PilusMediatedBacterium will lose energy in two ways: by moving or by deploying its grapple.
[Question Q4.9] The energy loss factors used to calculate energy loss in each case are given by the values associated with ["energy"]["consumption factor"]["move"] and ["energy"]["consumption factor"]["tentacle"] in the configuration file. Which "getters" do you propose to add/override to/in your class to retrieve these values when necessary?
Answer this question and justify your choices in your file REPONSES
Implement the PilusMediatedBacterium class using the previous questions and answers.
Leave the movement-related code (the move method) blank for now, while planning for it, and start by designing the bacterium as a MonotrichousBacterium (but without duplicating code!).
The constructor for this class will be coded similarly to that of single-flagellated bacteria (with the bacterium’s position as the sole parameter); it must, of course, adapt to the configuration parameters related to "pilus mediated" in the configuration file.
The maximum length of the grapple and its speed will be defined as mutable parameters of the positive numeric type (draw directly from what you did for the single-flagellated bacteria when building them).
Grappling Hook
To model the grappling hook, you only need to model its tip. This is indeed the only part that interests us, since it will allow the bacterium to “ grip ” onto nutrient sources.
We therefore suggest implementing a small utility class Grip that models the gripper’s tip (i.e., the end that allows it to latch on).
- We will, of course, need to perform collision tests between this gripper and nutrient sources, so it makes perfect sense to make this object a circular body.
- Code the Grip class in the Lab folder, as it is not a general utility.
A grapple will be constructed using a position and a radius passed as parameters.
The only method that seems useful for a grapple is one that allows its position to be moved (remember CircularBody::move).
Finally, the grapple must, of course, become an attribute of the grapple-equipped bacterium.
Complete your code to incorporate this. You will add a utility method void moveGrip(const Vec2d& delta) to the PilusMediatedBacterium class, allowing you to move the position of its gripper.
Complete drawing of a grapple bacterium
So far, a grapple bacterium is drawn as a simple circle. The next step is to add the grapple to this representation.
To do this, simply draw a line segment between the bacterium’s position and the grapple’s position, and draw the grapple as a small circle.
To draw a line segment with SFML, you can use the utility function buildLine provided in src/Utility/Utility.hpp:
  auto line = buildLine(position1, position2, color, thickness);
  target.draw(line);
where position1 and position2 are the two endpoints of the line segment, color is an SFML color, and thickness is the line thickness (1, for example).
Test 13: Grappling Bacteria Without Movement
To test the code developed so far, you can use the provided test GraphicalTest/GripTest.cpp, which can be run using the target gripTest (which you will have taken care to uncomment in the file CMakeLists.txt).
Since gripper bacteria cannot yet move, they must be created in locations favorable to their survival!
So let a nutrient source develop, then create a gripper bacterium on it using the 'P' key.
You should see a bacterium appear with a tentacle already deployed (only in the case of this test, since upon creation a bacterium normally has a retracted tentacle: for the curious, take a look at how the provided test works).
You should see the bacterium feed, divide, and mutate (in color). The bacterium resulting from division must not have its gripper deployed.
| ←Feel free to adjust the settings in the app.json file to make the split more or less likely |
Method of Movement
The movement of a motile bacterium is a process that can be modeled using what is known as a finite-state machine, as illustrated in the following diagram:
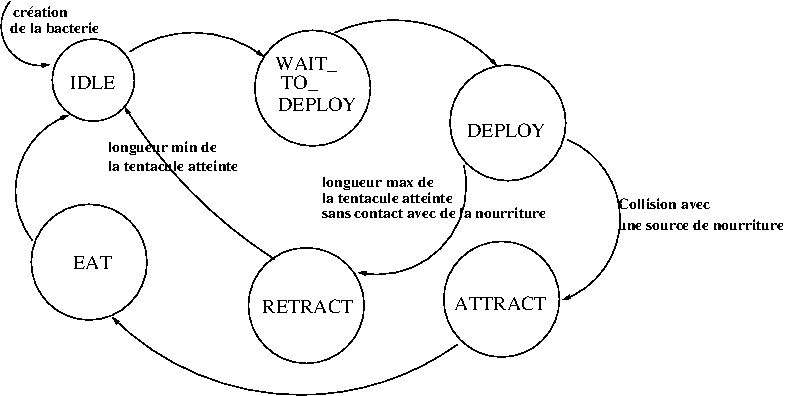
This diagram indicates that the bacterium goes through various states (IDLE, DEPLOY, etc.) during its operation, that each state requires a certain number of actions to be performed, and that the transition from one state to another can be triggered by a number of events.
The table below completes the description of the state machine by describing the actions to be taken in each state :
| State | Description | Actions |
| IDLE (the bacterium is in this state upon creation) |
Grapple at rest | Nothing in particular (just transition to the next state). |
| WAIT_TO_DEPLOY | Grapple preparing for deployment |
|
| DEPLOY | Grapple deploying |
|
| ATTRACT | Grappling hook pulling the bacterium toward the food |
|
| RETRACT | Retracting Grapple |
|
| EAT | Bacteria consuming food |
|
[Question Q4.10] An enumerated type can be a good solution for listing the different states mentioned above. How would you propose using one to implement the movement algorithm?
Answer this question in your file REPONSES.
Complete the move method to implement the finite-state machine described above.
Test 14: Movement of a bacterium with a gripper
To test this section, you can use the provided test GraphicalTests/PilusMediatedTest.cpp, which can be run using the target pilusMediatedTest (which you should have uncommented in the file CMakeLists.txt).
This test allows you to create pilus-armed bacteria using the 'P' key.
Delay nutrient generation by adjusting the ["generator"] ["nutrient delay"] and create one or more bacteria on a plate without nutrients, close to the edges of the box. You should be able to observe that:
- The tentacles extend but cannot do so beyond the boundaries of the box.
- That the tentacles retract if they reach a certain length or if they touch the edges of the box.
- That once nutrients are generated, the tentacles extend more toward the interior of the box (perception of the nutrient gradient).
- Bacteria that extend their tentacles a certain number of times without successfully reaching nutrient sources eventually die and disappear from the box.
- And tentacles touching nutrients allow the bacteria they belong to to move closer and feed on them.
| ←Feel free to experiment with the settings in the app.json file to try out different parameters related to the claw bacteria |
Back to the project description (Part 4) Next module (Section 4.3)