Project 2026
“Microbial Cultures”
Disclaimer: the automatically generated English translation is provided only for convenience and it may contain wording flaws. The original French document must be taken as reference!
Goal
Through this project, you will learn how to create a complete program that is larger in scale than those you have worked with up to now. Your program will also include a graphical component. In terms of computer science, the goal of this project is to consolidate your programming knowledge and give you practice with the essential concepts of object-oriented programming: abstraction and encapsulation, inheritance, virtual methods, and polymorphism.
It is not recommended to print the entire project statement: additional information may be provided along the way.Introduction
Every program must be designed before it is implemented. The purpose of this design phase is to establish a computer model of the program's components, which involves asking a number of questions:- What information does the program need, and what are the relationships between these different pieces of information?
- What transformations will this information undergo?
- Who will decide, and based on what parameters, when these transformations will be applied?
- etc
The explanation below aims to outline in (very) broad terms the approach we would like you to adopt for this project.
First steps toward designing a program
When the program is launched, a window should open and display a view of the simulation. Here is one example among many:
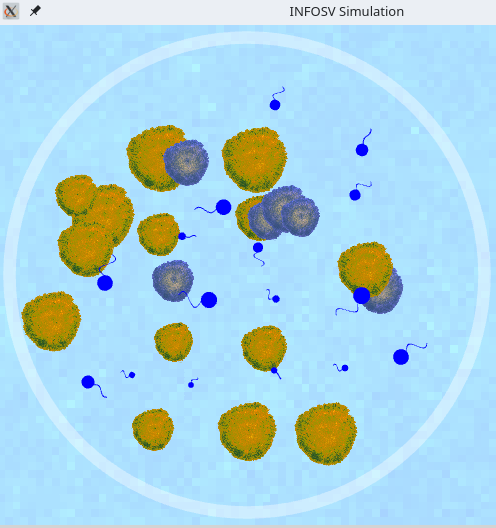
Various settings (e.g., the temperature in the culture boxes) can be adjusted using graphical menus. In the example above, the simulated culture box (white circle) contains a single type of bacteria (shown here in blue with a flagellum) and sources of nutrients (the yellow or blue “mold” spots). The application will be able to have several types of bacteria (differentiated by distinct graphical representations) coexist in such a box, which will evolve in competition (or symbiosis) for access to nutrients.
It is reasonable to assume that each of these elements on the screen will need to have a C++ equivalent in your code.
When designing the program, it is necessary not only to identify the elements to be modeled, but also to ask a number of questions such as:
- How do the elements involved in the simulation interact with each other?
- Do they have anything in common, or are they completely independent?
- etc..
Below, we outline the fundamental elements that will be involved in the program to be implemented.
Basic objects
In light of the above description, the following classes seem to be essential:
- A class to represent the environment to be simulated: the culture boxes and the support on which they rest. The latter will identify the bacteria present and the available nutrient sources;
- others for the bacteria, of course, without which nothing would happen :-)
- classes to represent the nutrient sources;
- etc.
More specifically, it will quickly become apparent that there are elements common to all bacteria, such as the fact that they have a position in a culture dish and a speed of movement. There will also be differences, for example in behavior: grappling bacteria have different modes of existence than single-flagellated bacteria.
We can therefore imagine a base class (Bacterium) to specify the characteristics and methods common to all bacteria. We will then need to specialize this base class (concept of inheritance) to characterize attributes and methods specific to the different categories of simulated bacteria.
To summarize, we can thus anticipate the different elements involved in the simulation and gradually propose a possible design for the program. As you progress through the project, you will find detailed diagrams explaining the program architecture that we suggest you follow. It is essential to understand this in order to implement it correctly. It is clear that other simpler, more complicated, or simply different solutions exist, and each (simple or complicated) generally has advantages and disadvantages. However, the model we propose is reasonable, and following it will save you time.
Simulation core and graphical displays
To perform the simulation, we will change the environment over time (its bacteria, nutrient sources, etc.).Time is sampled (we refer to this as discrete time steps). At each time step, each bacterium, for example, may undergo or cause a number of events depending on the context (consume nutrients, divide, die, etc.). These actions determine the evolution of the system over time.
The elements of the system will therefore generally have:
- content (the data and methods used to model them);
- a graphical representation (how we display them);
- behavior (the actions taken depending on the context or how they should react to possible external events, such as configuration via the menu, for example).
The guidelines in the project statement will help you arrive at a design that meets this requirement.
The simulation kernel , which will cause the world to evolve over time and take into account any user interventions, will be provided. This core will enable you to:
- start the simulation;
- communicate any user interventions to the program (e.g., the user's wish to stop the simulation);
- and, above all, call the methods necessary for the simulation to run in a “loop.” One of your key tasks in this project will be to provide these methods.
Graphics library
There is no standard library in C++ for defining graphical interfaces. Each of the existing libraries therefore has its own specific features, functionalities, prototypes, etc.Among the possibilities :
We chose the latter option for its ease of use. It will provide you with the necessary features for graphics and event management in your program.
Registration
If you haven't registered yet, do so before Monday, March 16 at 9 a.m.!
Steps
Create a subdirectory projet (word for "project" in French) in the directory ~/Desktop/myfiles/Programming/cpp. All files related to this project should be located in the directory ~/Desktop/myfiles/Programming/cpp/projet.A schedule of the different steps is provided in the project description, and below you will find advice on which classes to implement and how to do so. It is recommended that you follow these guidelines, but you can of course add or modify elements as you wish in order to customize your program.
The project is
designed to be done
in pairs, so share the work as soon as you start to
feel comfortable with the subject.
Developing in parallel and in a
complementary manner is certainly an
instructive
experience, but it obviously requires
good
communication between you to be effective.
Throughout the development process, you can check your program using small test programs. To debug your program, you have two options (which are often used in conjunction):
- Use cout (or, much better, cerr) to identify where the program “crashes” and the value of the attributes at that location
- use the debugger by compiling your program with the -g option and running it with the command ddd myprogram. This second option (see DDD mini-reference) is essential for certain types of errors.
Important: The statement provided is quite detailed but does not necessarily give all the information. You will therefore need to supplement what you are given with a little personal investigation. The assistants, and in particular your coach, are there to help you. It is also possible that additional information will be provided along the way if necessary .
The necessary archives are provided as and when they become necessary.
Important: Don't forget to comment on your code! Part of the final mark will be based on the comments.
Step 1: Circular contours (warm-up)
Goal: Implement a base class representing circular contours. These will be useful for various essential aspects of the program, such as managing collisions between entities (encounters).
Required concepts: classes, encapsulation, constructors, destructors, and operator overloading
These concepts are explained in lessons 16, 17, and 18.Estimated coding time: 1 week of supervised lab work (from Tuesday of week 5 inclusive, to Tuesday of week 6 exclusive, according to the numbering in the course outline)
Click here to access the assignment for this part.
Step 2: Culture boxes and nutrients
Goal: Implement the environment in which our future bacteria will evolve. This will essentially consist of a set of culture boxes in which nutrients will grow.
Required concepts : object classes, constructors/destructors, operator overloading, and inheritance
These concepts are explained in lessons 16, 17, 18 & 19.Estimated coding time: 2 weeks of supervised lab work (from Tuesday of week 6 inclusive, to Tuesday of week 8 exclusive, according to the numbering in the course schedule).
Click here to access the assignment for this section.
Step 3: Bacteria enter the scene
A first type of bacteria, single-flagellated bacteria, appears. Nutrient sources become differentiated.
Required concepts: classes, constructors/destructors, inheritance, polymorphism
These concepts are explained in lessons 16, 17, 18, 19, 20, and 21.Estimated coding time: 2 weeks of supervised lab work (from Tuesday of week 8 inclusive to Tuesday of week 10 exclusive, according to the numbering in the course outline).
Click here to access the assignment for this part.
Step 4: Competing bacteria
Introduce new types of bacteria that compete for access to nutrients: «grapple» bacteria and bacteria with group movement.
Required concepts: classes, constructors/destructors, inheritance, polymorphism.
These concepts are explained in lessons 16, 17, 18, 19, 20, 21 & 22Estimated coding time: 2 weeks of supervised practical work (from Tuesday of week 10 inclusive, to Tuesday of week 12 exclusive, according to the numbering in the course plan)
Click here to access the assignment for this part.
Step 5: Differentiated nutrients and statistics
Complete the system so as to enable:
- differentiated interaction of bacteria with different nutrient sources, depending on their type;
- display of simulation statistics.
Required concepts : classes, constructors/destructors, inheritance, I/O, and standard library.
Estimated coding time: 1 week of supervised lab work (from Tuesday of week 12 inclusive to Tuesday of week 13 exclusive, according to the numbering in the course schedule).
Click here to access the assignment for this part.
Step 6: Extensions
Click here for some suggestions.
Some references
You will also find references on the C++ language here (in French).